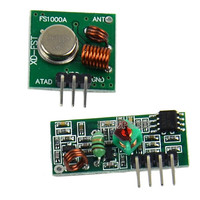
 The RF transmitter/receiver pair
After my wildly successful post How to turn your Raspberry Pi into an infrared remote control, which was mainly a list of various resources and instructions on how to record and replay infrared signals with the Raspberry Pi, I am writing the second instalment, on controlling RF devices with it.
I’ve long wanted to control my garage door from the internet (because apparently I love making useless enhancements to things that run on electricity), but I couldn’t figure out the codes it sends. Even though I could, in theory, use the Raspberry Pi as a poor man’s RF transmitter (hint: don’t do this because of the noise, and it doesn’t work anyway because of kernel timings), I didn’t know what to transmit with it, and I couldn’t find the protocols anywhere online.
To help in this herculean task, I bought an RF transmitter/receiver pair (pictured on the right) from eBay for around 1 euro (with shipping), which can decode received signals (and send them again).
The receiver
It just arrived yesterday, and I spent a few hours last night researching how I could make it work and recording signals. I managed to record the signals by connecting the receiver to my soundcard’s line-in input. You have to use a voltage divider (two resistors, I used a 1K and a 4K, connected in the voltage divider configuration, to drop the voltage).
These are the steps:
 The voltage divider schematic
- Connect the receiver’s VCC and GND pins to the Pi’s 5V and ground pins. If you’re having trouble with 5V, try the 3.3V pin, it worked better for me (less noise).
- Connect one end of the line-in cable (the ground, the long bit) to the ground pin of the RasPi.
- Connect the data pin of the receiver to a voltage divider, I used a 4.2 KΩ and a 1 KΩ resistor (for Z1 and Z2 in the schematic respectively) to drop the voltage from 5V to around 1V, which is what the line in expects.
- Connect the output of the voltage divider to the other line-in end.
This way, your transmitter is hooked up to the 5V/GND pin, and your line-in cable is connected to the data/GND pins via the voltage drop, which gives it perfect range to read the signals the transmitter sends.
Once that’s done, I used the excellent (really, I can’t recommend this enough) IR protocol analyzer to just read the line-in and copy the timings to the clipboard. Copying the timings is very handy because it’s, essentially, a zero-effort way to transmit them (by using LIRC to just send them raw).
The transmitter
To transmit, just connect the transmitter to the 5V/GND pins and connect the data pin to the GPIO pin you designated as LIRC output (see previous post for configuring this). That’s all there is to it, then you can use the (similarly previously) already-installed LIRC to transmit using the raw timings.
I used the following Python two-liner to convert the protocol analyzer timings to a LIRC raw format (they come with tabs by default, make sure you convert those to spaces in Notepad or similar before running this):
# Sample timings, replace protocol analyzer's tabs with spaces.
timings = "604 646 1292 646 1292"

# Make a list out of them.
timings = timings.split()

# Print them, 6 in a row.
print "              " + ("\n              ".join([" ".join(timings[x*6:(x+1)*6]) for x in range(1+(len(timings)/6))]))
You might want to remove the first pulse and add a fake “100” one at the end, because LIRC expects the first pulse to be a high (protocol analyzer gives a low) and it also expects the number of pulse timings to be odd.
The transmitter
Below is the config I use for my RF sockets, which I got from Lidl (they’re also on Alibaba):
begin remote

  name  rf
  flags RAW_CODES
  eps             30
  aeps          100

  ptrail          0
  repeat     0     0
  gap          108229

      begin raw_codes

          name on1
              604 646 1292 646 1292 625
              1292 646 1271 667 1271 646
              1271 646 1271 667 1271 667
              1271 646 1271 646 1271 667
              1271 667 1250 667 1229 667
              1208 1312 583 687 1250 667
              1229 667 1208 1312 583 4979
              100

          name off1
              625 625 1312 625 1292 625
              1292 646 1292 646 1271 646
              1292 625 1292 646 1271 667
              1271 646 1271 667 1271 646
              1271 667 1271 646 1271 667
              1250 667 1271 667 1271 667
              1250 667 1250 667 1250 4979
              100

          name on2
              604 646 1292 625 1292 646
              1271 646 1271 667 1271 646
              1292 646 1271 646 1271 667
              1271 667 1250 667 1271 646
              1271 1354 583 667 1229 667
              1208 1312 583 687 1229 667
              1208 1333 562 1333 583 4979
              100

          name off2
              604 646 1292 625 1292 646
              1292 625 1292 646 1292 646
              1271 646 1271 667 1271 646
              1292 646 1271 646 1271 667
              1250 1375 583 667 1250 667
              1250 667 1271 687 1229 667
              1250 1354 583 667 1250 4979
              100

          name on3
              625 625 1312 625 1292 625
              1292 625 1312 625 1292 646
              1292 625 1292 646 1271 667
              1271 646 1271 646 1292 646
              1271 667 1250 1292 604 667
              1229 1292 604 667 1271 646
              1271 646 1271 667 1250 4979
              100

          name off3
              625 625 1312 625 1292 625
              1312 604 1312 646 1292 625
              1292 625 1292 646 1271 667
              1271 646 1292 646 1271 646
              1271 667 1271 1333 583 667
              1271 646 1271 667 1250 667
              1229 687 1187 1333 562 4979
              100

          name on4
              625 625 1312 625 1292 625
              1292 646 1271 667 1271 646
              1292 625 1292 646 1271 667
              1271 646 1271 667 1250 667
              1271 1333 583 1312 604 667
              1208 1312 583 687 1229 667
              1250 1354 583 667 1250 4979
              100

          name off4
              604 646 1292 646 1271 646
              1271 646 1292 646 1292 646
              1271 646 1271 646 1271 667
              1271 667 1271 646 1271 667
              1250 1354 583 1354 583 667
              1250 667 1271 667 1229 667
              1229 1292 604 1292 604 4979
              100

          name dim
              625 625 1292 646 1292 625
              1292 625 1292 667 1271 646
              1271 646 1292 646 1271 667
              1271 646 1271 646 1271 667
              1271 1333 604 1333 604 646
              1271 667 1250 1354 583 667
              1229 667 1229 1292 604 4979
              100

          name bright
              625 625 1292 646 1292 625
              1292 646 1271 667 1271 646
              1271 646 1292 646 1271 667
              1271 646 1271 646 1271 667
              1271 1312 604 1312 604 646
              1229 1312 583 1354 604 667
              1250 667 1250 667 1271 4979
              100

          name allon
              625 625 1312 625 1292 625
              1312 604 1312 646 1292 625
              1292 625 1292 646 1271 667
              1271 646 1292 625 1292 646
              1271 1312 604 1292 604 1292
              604 1292 604 667 1271 646
              1271 667 1250 667 1271 4979
              100


          name alloff
              646 625 1312 604 1312 604
              1312 625 1292 646 1292 625
              1312 625 1292 625 1292 646
              1292 625 1292 646 1271 646
              1292 1312 604 1312 604 1333
              604 646 1271 687 1229 687
              1208 687 1208 1312 583 4979
              100


      end raw_codes

end remote
This enables me to control all four sockets with my Raspberry Pi simply and efficiently, making me a happy man. Unfortunately, I haven’t managed to record my garage door remote with the receiver, which means that it probably runs on a different frequency. That is a pity, but I might get a different frequency receiver to try that.
Remote-controlling more efficiently

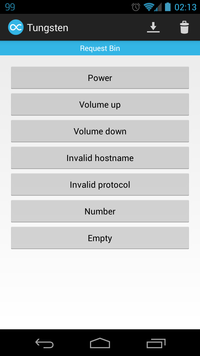
To make remote controlling these devices easier, I wrote a simple HTTP server in Flask that I can access through a web interface and turn these on and off. Unfortunately, the latency was too much, so I am currently writing an Android app (which I call Tungsten, look for it soon in a Play Store near you!) to easily control arbitrary devices from your phone.
The way this app works is this:
- You write the configuration in a very simple YAML file (basically the number and layout of buttons and HTTP calls you want them to make).
- You put this on your server (or any server).
- You open the app and download the file, and the app creates panes of buttons (you can control multiple devices with this, the panes swipe left and right, like tabs).
- You press the buttons to instantly make an HTTP call to your Raspberry Pi HTTP server and control the device you want.
It’s that simple! This workflow also allows you to publish your Tungsten panes along with your HTTP control server, so potential users can just point their device to your server and download the layout with the buttons and proper HTTP call URLs. You’re also not limited to just Raspberry Pi, the app just performs POST requests, so anything that is used via POST can work with Tungsten very easily.
If you want to be notified when my app launches, follow me on Twitter, on Google Plus, or subscribe to my mailing list below.
For any comments/suggestions/cool projects, leave a comment anywhere!